jorextensions.com free extensions for WYSIWYG Webbuilder
jordan (6j6)
jordan (6j6)


tutorial for module | parallax
jor_aniMateMASTERPACKv3.0 build 5
jordan (6j6) - jorextensions.com
jor_aniMateMASTERPACKv3.0 build 5
jordan (6j6) - jorextensions.com
TUTORIAL module | parallax - basic
Welcome to this tutorial for jor_aniMateMASTERPACKv3.0 ...
In this tutorial we will use module | parallax to create a basic parallax effect, a composition
Module | parallax can be found under the section 04. MODULES SECONDARY 2 in the extension
Module | parallax can be found under the section 04. MODULES SECONDARY 2 in the extension
THE SELECTOR ?
.
To work with jor_aniMateMASTERPACKv3.0 it is crucial to understand the selector input
"The better understanding of the selector the more we can get out of jor_aniMateMASTERPACKv3.0"!
To gain an understanding of the selector input see the jor_aniMateMASTERPACKv3.0 online manual first
see here ...
• Selectors Simplified
• When do we animate what ?

We want to create a background image parallax in this Tutorial 1
So, next we need to set module | parallax into the correct mode
For this we set the mode property to parallax background image (=default)
So, next we need to set module | parallax into the correct mode
For this we set the mode property to parallax background image (=default)
JMPv3.0 almost always directly uses WB objects to work with
So ... first we need to add a WB Image object to our project to work with
We add a WB Image object to our project
The id of our WB Image object we name BGpar the full selector becomes #wb_BGpar
So ... first we need to add a WB Image object to our project to work with
We add a WB Image object to our project
The id of our WB Image object we name BGpar the full selector becomes #wb_BGpar

mode = parallax background image

In this Tutorial 2 we will add 3 objects with the mode parallax object
So, just like in the first tutorial we will add 3 WB Image objects to our project
The image objects are going to be positioned left, center and to the right of the window viewport
We will not go over each of the individual settings of these 3 images, they all use the same parallax mode
We will focus on the left image
The id of our left image we name Lpar the full selector becomes #wb_Lpar


What is jor_aniMateMASTERPACKv3.0 ?
jor_aniMateMASTERPACKv3.0 is a collection of 15+ modules and 8+ tools combined in one extension
They can work together as a pack to create a complete new extension or modules can be used freestanding
jor_aniMateMASTERPACKv3.0 is a tool first and foremost - combined with creativity the possibilities are endless
Download the demo's of the above tutorials here as WB project ...


module | parallax is a tool of jor_aniMateMASTERPACKv3.0 build 5 • 2009 - 2015
more demo's, info, online manual, etc for jor_aniMateMASTERPACKv3.0 visit jorextensions.com
jor_aniMateMASTERPACKv3.0 free extension for WYSIWYG Webbuilder
extension and code: jordan (6j6)
more demo's, info, online manual, etc for jor_aniMateMASTERPACKv3.0 visit jorextensions.com
jor_aniMateMASTERPACKv3.0 free extension for WYSIWYG Webbuilder
extension and code: jordan (6j6)
Hope you found these tutorials informative and useful ...
Module | parallax can be used in many other setups
These demo's should be a good start point to experiment with
Module | parallax can be used in many other setups
These demo's should be a good start point to experiment with
Online Manual
Online Manual - parallax
Online Manual - Selectors Simplified..
Online Manual - When do we animate what ?
Online Manual - parallax
Online Manual - Selectors Simplified..
Online Manual - When do we animate what ?
WYSIWYG Webbuilder Forum Topic JMPv3.0
More tutorials for JMPv3.0 see Online Tutorials
More free WB extensions visit jorextensions.com
Back To Top
More tutorials for JMPv3.0 see Online Tutorials
More free WB extensions visit jorextensions.com
Back To Top


Our WB Image object is now set to work as a background image
Next we need to determine the dimension of our background image
We can set the dimension in percentage with the parallax background properties
That's the first part of our parallax composition tutorial completed

selector = #wb_Lpar
The image in center we name Cpar the image to the right we name Rpar

Level: Easy

module | parallax - basic - tutorial

The parallax background
Tutorial 1

Tutorial 2
The parallax object


TUTORIAL
jor_aniMateMASTERPACKv3.0 b5
module | parallax
jor_aniMateMASTERPACKv3.0 b5
module | parallax


SEE LIVE DEMO 1


DOWNLOAD DEMOS


parallax mode
parallax mode
Next step is to set module | parallax into the correct mode
This time we set the property mode to parallax object
This time we set the property mode to parallax object

mode = parallax object


SEE LIVE DEMO 2


UPDATE: jor_aniMateMASTERPACKv3.0 build 5.2 update **NEW IMPORTANT**
From JMPv3.0 build 5.2 on the new extension jor_aniMateLIMITER is required to run module | parallax
Read more about jor_aniMateLIMITER - Here
UPDATE: jor_aniMateMASTERPACKv3.0 build 5.3 update **NEW**
Almost a complete rewrite for module | parallax has been made for JMPv3.0 b5.3
From JMPv3.0 build 5.2 on the new extension jor_aniMateLIMITER is required to run module | parallax
Read more about jor_aniMateLIMITER - Here
UPDATE: jor_aniMateMASTERPACKv3.0 build 5.3 update **NEW**
Almost a complete rewrite for module | parallax has been made for JMPv3.0 b5.3
Comments, feedback etc regarding this tutorial please post them at the WB Forum Topic JMPv3.0 ...
jordan (6j6)
jordan (6j6)


A PARALLAX COMPOSITION
Module | parallax functions in 3 modes - 1. parallax background - 2. parallax object and 3. plaxify
In this tutorial we are going to use all 3 modes to create a single parallax composition


SEE LIVE PARALLAX COMPOSITION


Let's go ...

THE SELECTOR
Q:
Why do we need to add a #wb_ in front ?
A:
Parallax is about motion, moving objects, here we target a WB Image object
With motion we always want to target the element that holds the position of the object
• In this specific matter it is also done to keep in sync with this principle
"The SELECTOR is the key to working with JMPv3.0!"
We have our WB object now we can work with it, we enter the selector in the selector property

selector = #wb_BGpar
parallax background dimension

parallax | bg | width = 100
parallax | bg | height = 150
parallax | bg | repeat = false
parallax | bg | height = 150
parallax | bg | repeat = false
Here we set the width to 100 and the height to 150 percent, to enable a vertical scroll
Additionally we can set the background image repeat mode, here we set it to false
NOTE: module | parallax will now allow the width to be set below 100 percent!
parallax background motion
Next we need to determine the motion of our parallax ... vertical or horizontal or both ?
We enable which axis we want to animate with the parallax vertical and horizontal properties
In this Tutorial 1 we only want to create a vertical parallax, so we only focus on the vertical properties
• the horizontal properties function exactly the same as the vertical properties

parallax | vertical | enable = true
parallax | vertical | speed = .2
parallax | vertical | limit = true
parallax | vertical | loop = false
parallax | vertical | reverse = false
parallax | vertical | speed = .2
parallax | vertical | limit = true
parallax | vertical | loop = false
parallax | vertical | reverse = false
PROPERTY ENABLE
We enable the vertical motion with the parallax | vertical | enable property - (true/false)
PROPERTY SPEED
We set the speed of motion with the parallax | vertical | speed property
The speed is set from 0 upward into ratio, this might be a little puzzling, the following diagram might help ...
• Diagram Parallax Speed
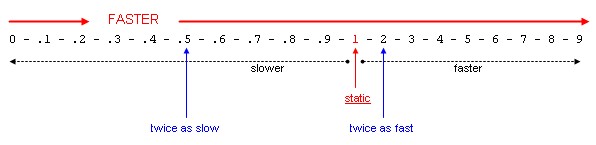
For this tutorial we set the vertical speed to .2 which is very slow
PROPERTY LIMIT
We set the limit to true on the parallax | vertical | limit property
This property stops the image from scrolling when it's end is reached, the image will not scroll of the screen
PROPERTY LOOP AND REVERSE
The loop (we will use in Tutorial 2) and reverse properties we set to false
And that's all the settings we have to make for our parallax background image
Left Image
parallax object motion
The parallax motion for our 3 image objects is set exactly in the same manner as our parallax background
In this Tutorial 2 we also only want to create a vertical parallax, so we only focus on the vertical properties

parallax | vertical | enable = true
parallax | vertical | speed = 4
parallax | vertical | limit = false
parallax | vertical | loop = loop outside
parallax | vertical | reverse = false
parallax | vertical | speed = 4
parallax | vertical | limit = false
parallax | vertical | loop = loop outside
parallax | vertical | reverse = false
parallax object position
In this Tutorial 2 we use 3 WB Image objects positioned to the left, center and right of the window viewport
We position them in these positions with the parallax object properties

parallax | object | offset = -150
parallax | object | z-index = 200
parallax | object | position = left
parallax | object | hor. scroll = true
parallax | object | z-index = 200
parallax | object | position = left
parallax | object | hor. scroll = true
Left Image
PROPERTY POSITION
With the position property we set the mode in which we want our parallax object to function, it's position
- Left will stick the object to the left of the window viewport, regardless of WB page centering
- Left will discard any -left - position that is set to an object in design time
- Right will stick the object to the right of the window viewport, regardless of WB page centering
- Right will discard any - left - position that is set to an object in design time
- Center will follow WB page centering if applicable
- Center will always abide the - left - position of the object as it is positioned in design time
So, for our left image we set this property to left for center to center and our right image to right
PROPERTY OFFSET
With the offset property we can set an additional left offset for our parallax object
Here ie. on the left image we have set an offset of -150 which will position our object a bit left off screen
For the center and right image here we have set the offset to 0
PROPERTY Z-INDEX
With the z-index property we can set a z-index for our parallax object
Most of the time we want a parallax object to stay in front or back of our design
By use of this property we don't have to re-stack our parallax object each time
On the left image we have set an index of 200 the center 300 the right image an index of 100
PROPERTY HORIZONTAL SCROLL
With the horizontal scroll property we can enable the vertical positioned parallax object to abide the
horizontal scrollbar if applicable
Here we enable the horizontal scroll for all our 3 image objects
NOTE: if a horizontal parallax is enabled on an object this property is surpassed
Left Image
PROPERTY ENABLE
We enable the vertical motion with the parallax | vertical | enable property - (true/false)
PROPERTY SPEED
On the left image we use a speed of 4 on the center image 7 and on the right image a speed of 3.5
PROPERTY LIMIT
We don't want to limit any of our parallax objects to the viewport, we set the limit to false for all 3 images
PROPERTY LOOP AND REVERSE
The loop property has 2 modes 01. loop inside and (the new JMPv3.0 b5.3) 02. loop outside
The loop inside will loop the parallax object inside the window viewport
The loop outside will loop the parallax object outside the window viewport
The loop outside mode is much smoother, but, the object completely moves off screen before it loops
Here we use the loop outside mode on the left and the right image, - center we set to false
This will create the illusion of dozens of balloons scrolling over our page
The property reverse is set to false for all 3 images
And that's all the settings we have to make for our parallax objects

That's the second part of our parallax composition tutorial completed


Tutorial 3
The plaxify object

In this Tutorial 3 we will add the plaxify effect to 4 WB Image objects
We will use images that we already have in position in our design, the 4 centered balloons
We will not go over each of the individual settings of these 4 images, they all use the same plaxify mode
We will focus on the top image
The id of our top image we name plax1 the full selector becomes #wb_plax1
Top Image

selector = #wb_plax1
The other images are named plax2, plax3 and plax4
parallax mode
Next step is to set module | parallax into the correct mode
This time we set the property mode to plaxify
This time we set the property mode to plaxify

mode = plaxify
plaxify motion
The plaxify motion for our 4 image objects is set with the plaxify properties

Top Image
plaxify | range X = 200
plaxify | range Y = -100
plaxify | reverse = false
plaxify | range Y = -100
plaxify | reverse = false
PROPERTY RANGE
The range properties set the amount of motion on the X and Y axis, pos/neg values can be used
PROPERTY REVERSE
The reverse property reverses the motion, negative values on the range property have the same effect
The motion settings for the plaxified objects are basically set to our own creativity
And that's all the settings we have to make for our plaxify objects


SEE LIVE PARALLAX COMPOSITION


That's the third and final part of our complete parallax composition tutorial completed